
I have been intrigued by cake pops for almost a year now, but had never made them until this week. I am always up for a challenge and thought these looked like they would be lots of fun. Never did I imagine that the process would take over 6 hours. (In all honesty I think the shape of the pop makes all the difference!) Regardless of the time I spent on these, it really was a fun project and I had my friend Karla by my side making them with me. We had a blast!
It was a fun project but more than that it was a small way to say thank you to the teachers and staff at Tomahawk. Thank you for all that you do!
So I thought today I would let my boys give a shout out to their teachers and staff at Tomahawk Elementary. (Any other Tomahawk parent/student who wants to give a shout out just add it to the comments I will make sure the teachers/staff get to see them.)
To the Teachers and Staff of Tomahawk,
Thank you for supporting us and our school and helping us to learn. I appreciate Miss Irvine and all of the helpers who come into my classroom. I have fun learning about animals, math and science. I really enjoy going to all of the specials and am thankful for music, art, library, and physical education. – William
To the Teachers and Staff of Tomahawk,
I really enjoy all of the math that you give me. It is my favorite! I appreciate Miss Hess and think she is awesome. I have had lots of fun in kindergarten and am enjoying being a Tomahawk tiger. My favorite specials are P.E. and Art but I enjoy going to all of them and each of the teachers. I also am really thankful for my 5th grade buddies who help me with my projects. – Tyler

Cake Pops
Ingredients:
1 box cake mix (cook as directed on box for 13 X 9 cake) (I made one dark chocolate and one strawberry for 2 batches)
1/2 can frosting (16 oz.) (I mixed in vanilla for both of my cakes but use any flavor you like.)
Wax paper
candy melts (1 lb. package for each cake)
Lollipop sticks
Directions:
After cake is cooked and cooled completely, break into large pieces and put into the bowl of a stand mixer.
Add 1/2 can of frosting and mix thoroughly. (Start out slowly and increase the speed of your mixer as the mixture comes together.)
Roll mixture into quarter size balls and place on wax paper covered cookie sheet. (Should make 45-50) Put the cake balls in the freezer for 15 minutes to firm up. You could also refrigerate overnight if preferred. (I put mine in the refrigerator after the 15 minutes in the freezer and worked in batches so that they didn’t warm up too much.)
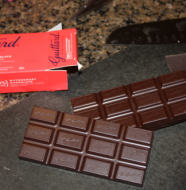
Melt chocolate in the microwave per directions on package (30 sec intervals, stirring in between) or on the stove top using a double boiler.
Dip the tip of your lollipop stick in a little of the melted candy coating and insert into the cake balls. (Insert a little less than halfway.)
Place them in the refrigerator for a little while to firm up.
Once firm, carefully insert the cake ball into the candy coating by holding the lollipop stick and rotating until covered. Once covered remove and softly tap and rotate until the excess chocolate falls off. Don’t tap too hard or the cake ball will fall off, too.
(I found that when the cake started falling off the sticks I needed to stick them back in the refrigerator and work with another batch.)
Place the sticks in a Styrofoam block to dry. Once they are set you can lay them down into a covered container and keep in the refrigerator.


Thanks to wonderful parents and students like Tyler and William for making it so fun to teach and for all the goodies this week!!!!
Tomahawk is the best little school around with the most AWESOME 2nd graders and parents ever! Glad the staff there feels that our kids deserve a great education, because that’s the way I feel too 😉 Thanks for all you do TIGERS!